Tire rotation is one of the simplest, and most overlooked, ways to extend the life of your tires. Move tires to where they wear more slowly, and the full set lasts longer and wears more evenly. A properly rotated set of four tires can outlast a neglected set by 15,000–20,000 miles. And the wear you find at each rotation tells you something useful about your car. This guide covers all of it.
Why Tires Wear Unevenly Without Rotation
Tire wear is not distributed equally across a car by default. Several forces drive uneven wear:
Drive axle vs. passive axle. The driven wheels carry the load of acceleration in addition to braking and steering on the same axle. On a FWD car, the front tires handle all three simultaneously while the rears just roll — front tires routinely wear 2–3x faster than rears when never rotated. On a RWD car the rear handles acceleration while the front handles steering and braking. The rear axle accumulates traction wear that the fronts do not, and on high-powered cars that imbalance can be extremely pronounced.
Steering scrub. Front tires turn for cornering and experience lateral scrub that rear tires do not. This wears the front edges faster on vehicles without rear-steer.
Weight distribution. A front-heavy car loads its front tires harder. Rear-engine cars load the rear. This directly affects wear rate.
Rotation periodically reassigns each tire to a different position with different wear demands, so the entire set wears toward even tread depth. Tires with matched tread depth handle predictably and maintain consistent traction front to rear, which matters most when braking hard or navigating a slippery surface.
Rotation Interval
Rotate every 5,000–7,500 miles. The common advice is to rotate with every oil change, which works fine if your oil change interval falls in that range. Modern extended-interval oil changes can stretch to 10,000 miles or more. Use the mileage spec, not the oil change as a proxy. If you drive aggressively, track the car occasionally, or run a heavier vehicle, lean toward the 5,000-mile end of the range.
Rotation Patterns by Drivetrain
Which pattern to use depends on whether your tires are non-directional (can be mounted on either side) or directional (tread pattern must rotate in one direction) and your drivetrain configuration.
Non-Directional Tires
Non-directional tires have no required rotational direction and can be moved to any position on the car. Many all-season and grand touring tires are non-directional. These tires allow the most flexibility in rotation patterns.
Forward Cross (FWD default)
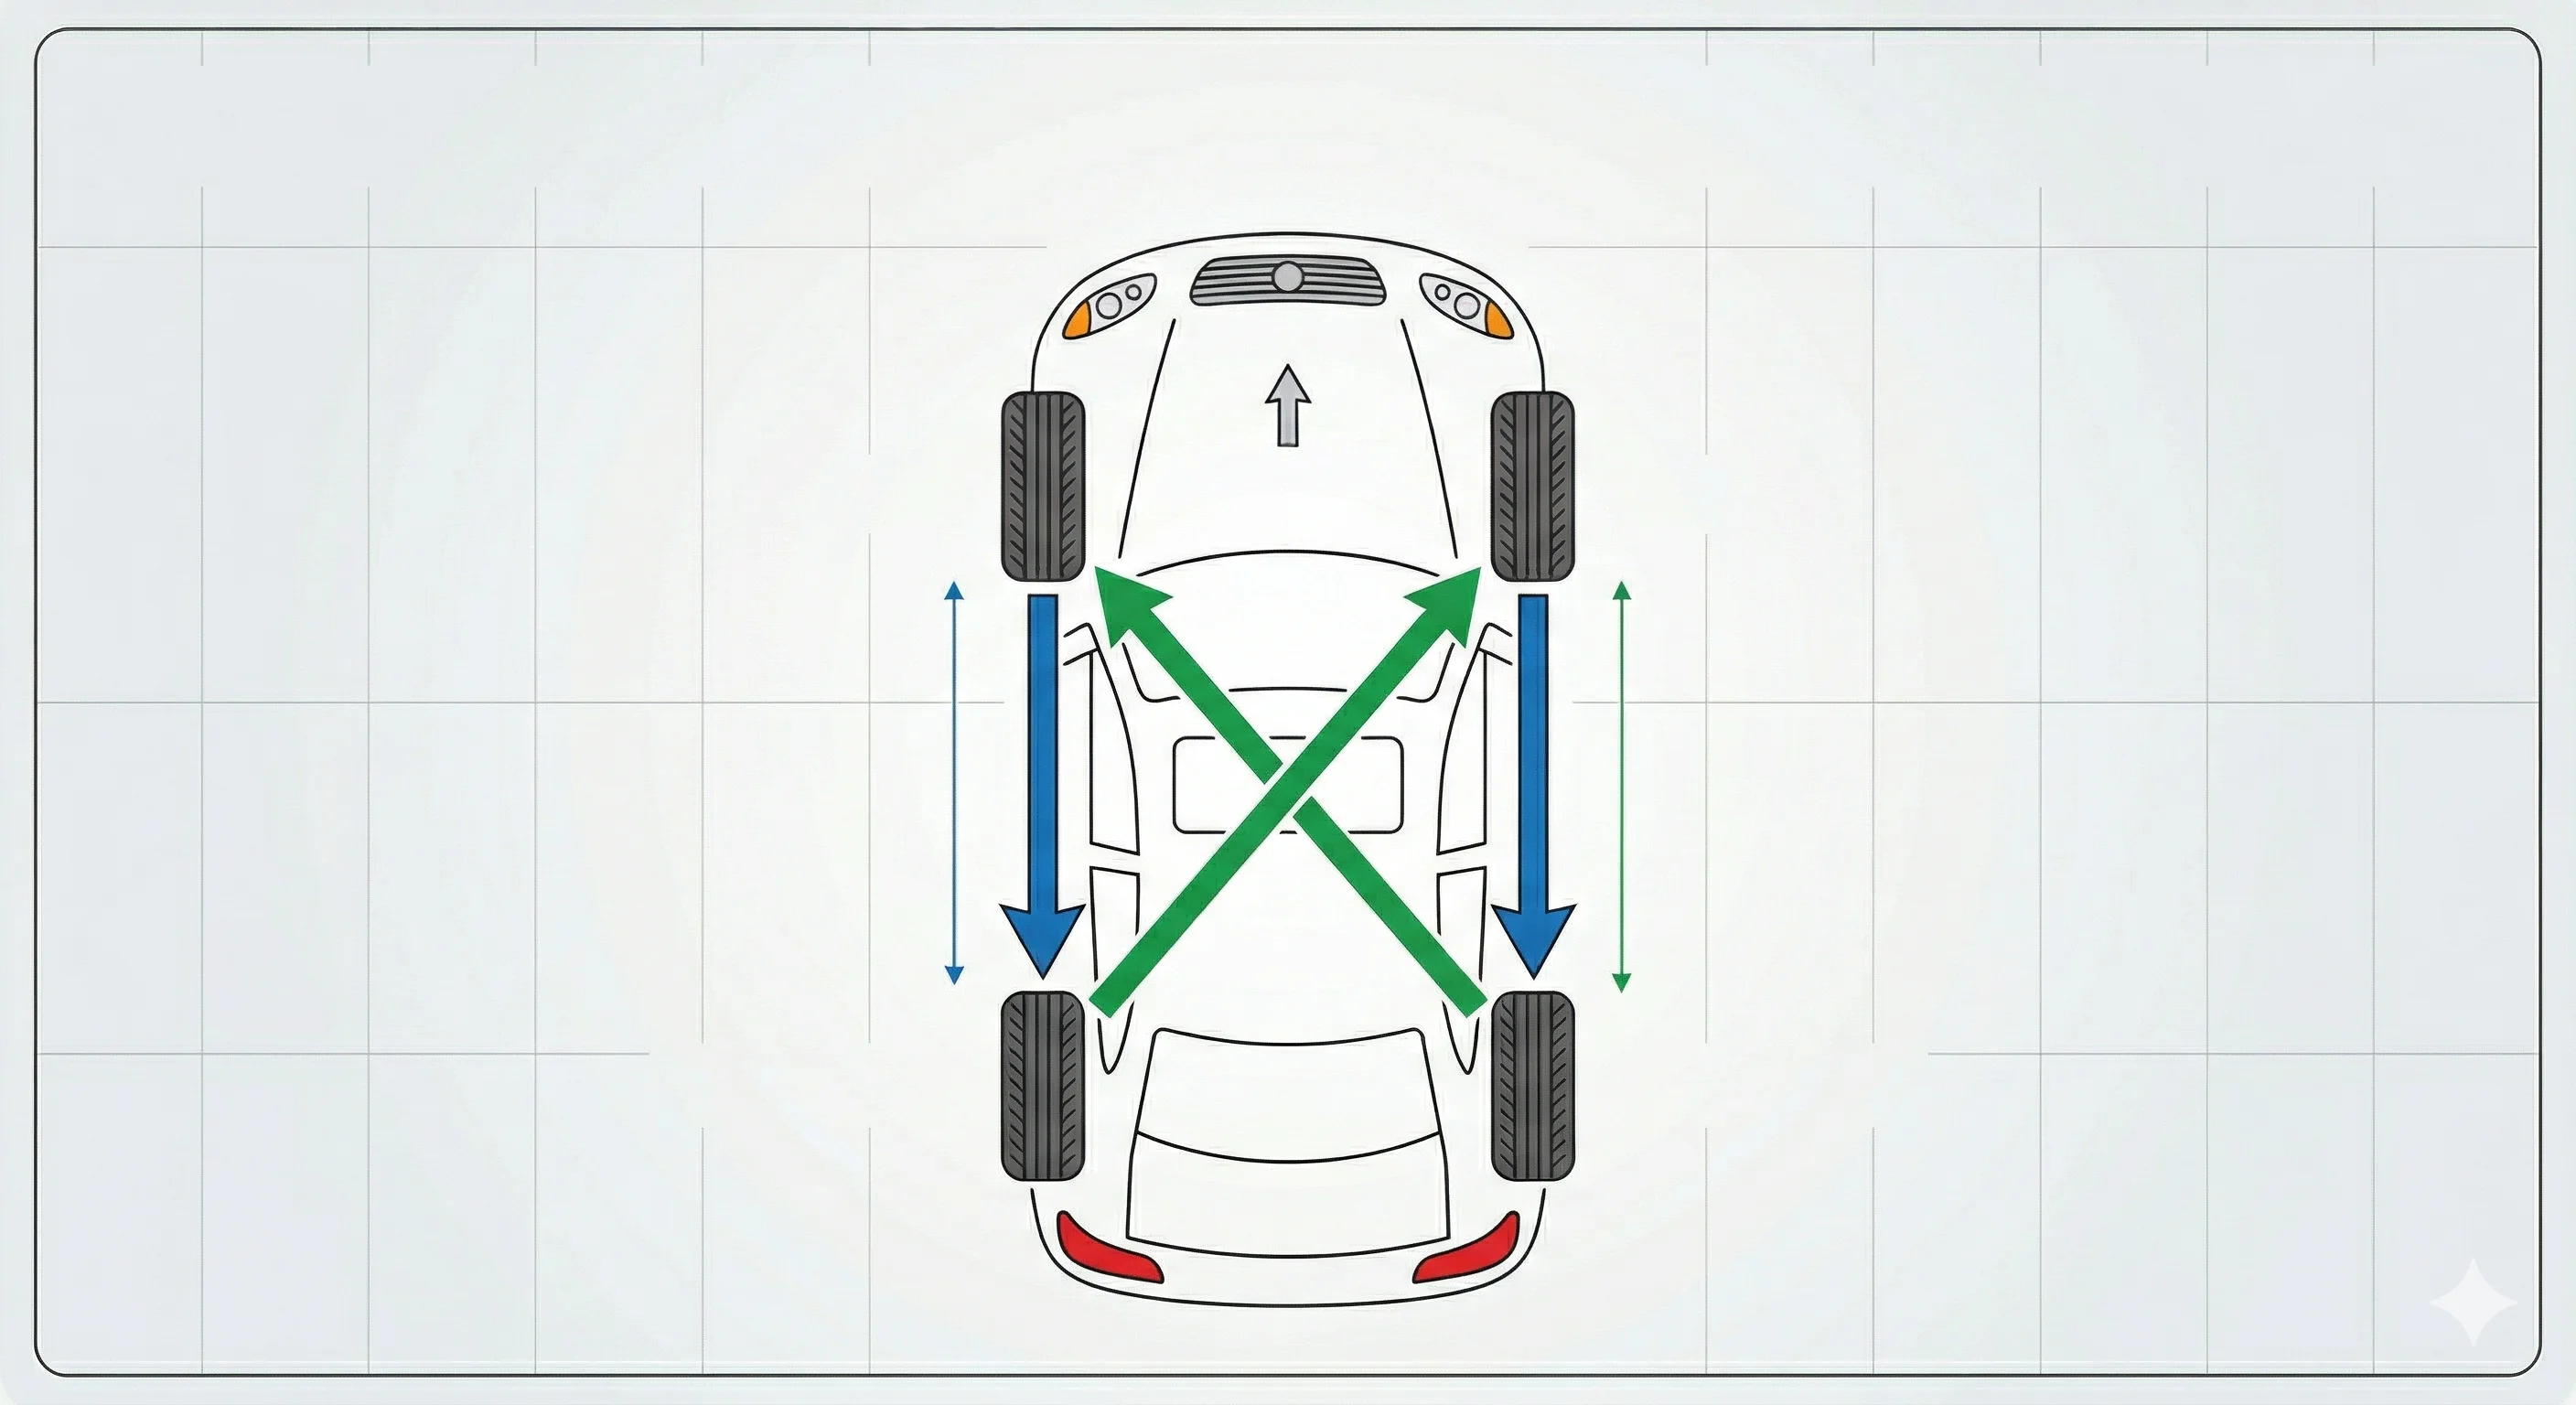
The front tires move straight back to the rear while the rear tires cross to the opposite front: left rear to right front, right rear to left front. This pattern prioritizes reducing wear on the front tires, which wear fastest on FWD cars. Moving the rears to the front in crossed positions slows their wear rate by putting them in the higher-load position with less accumulated heat from previous rotations.
Rearward Cross (RWD and AWD default)
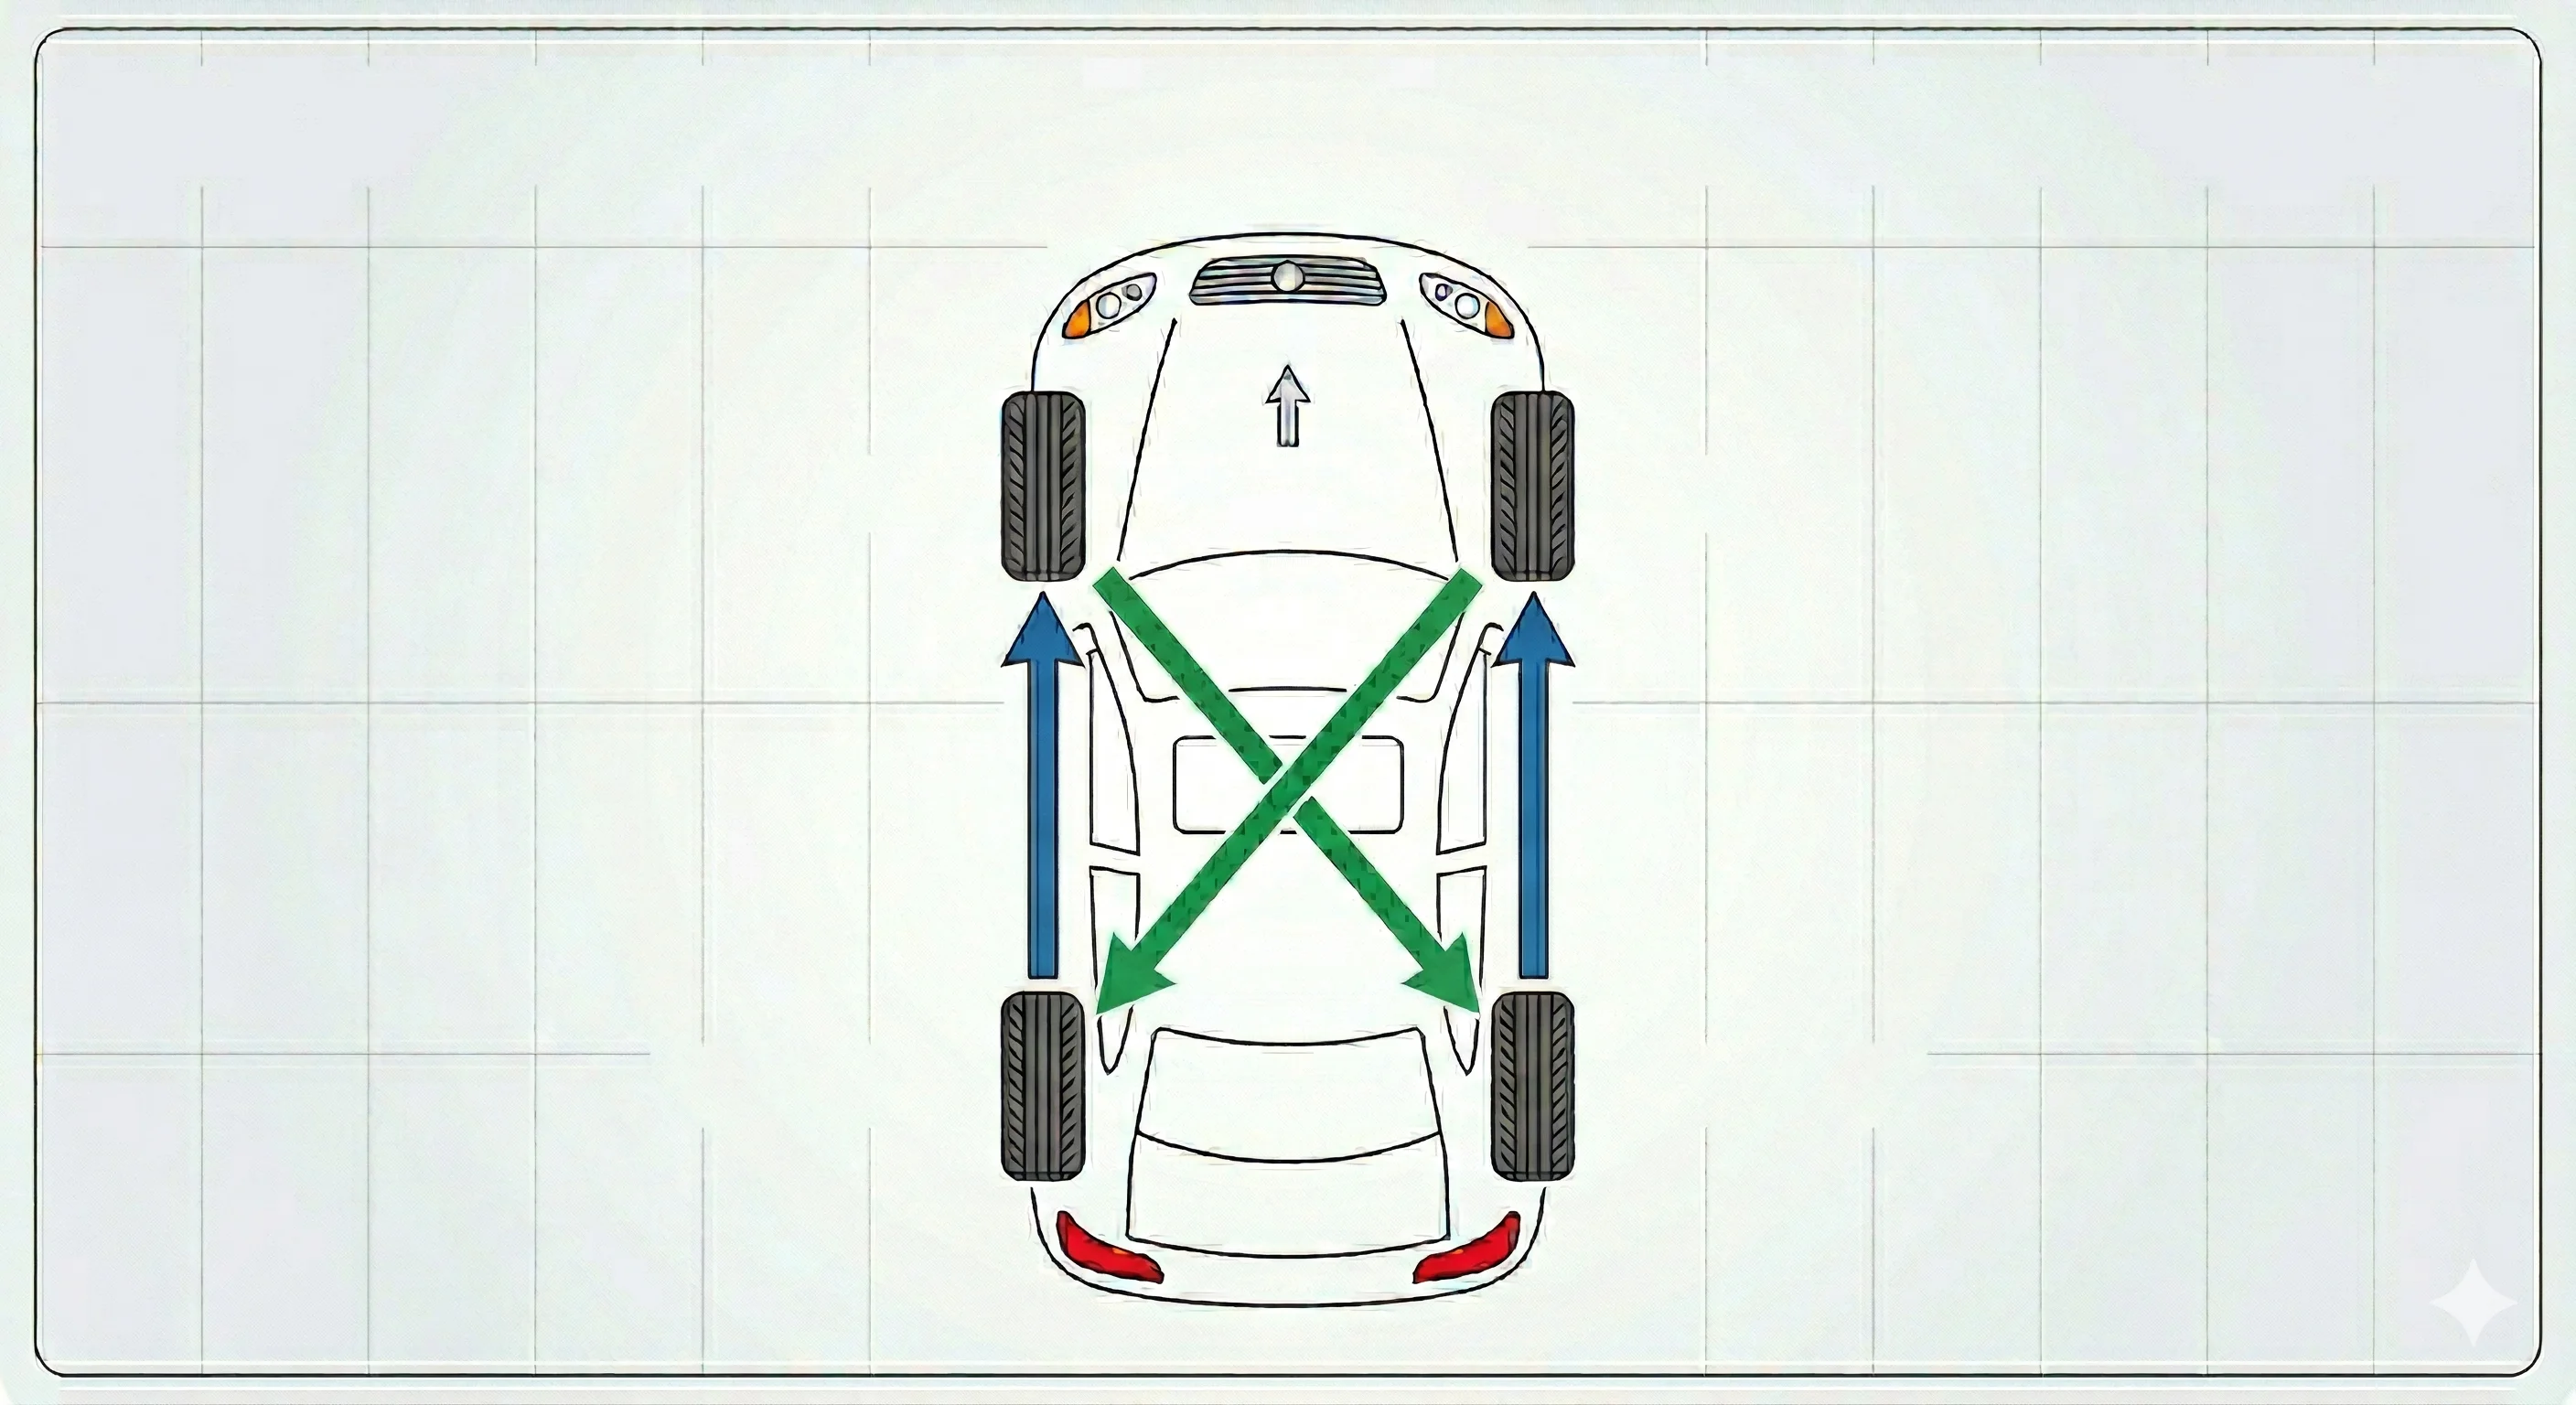
The rear tires move straight forward while the front tires cross to the opposite rear: left front to right rear, right front to left rear. This is the default for rear-wheel drive and all-wheel drive vehicles. On AWD cars, neither axle is purely passive, and the rearward cross distributes wear across more variables. On RWD cars, the rear tires experience more traction stress under acceleration and are moved to the lower-demand front positions to even out wear.
X-Pattern (Any drivetrain)
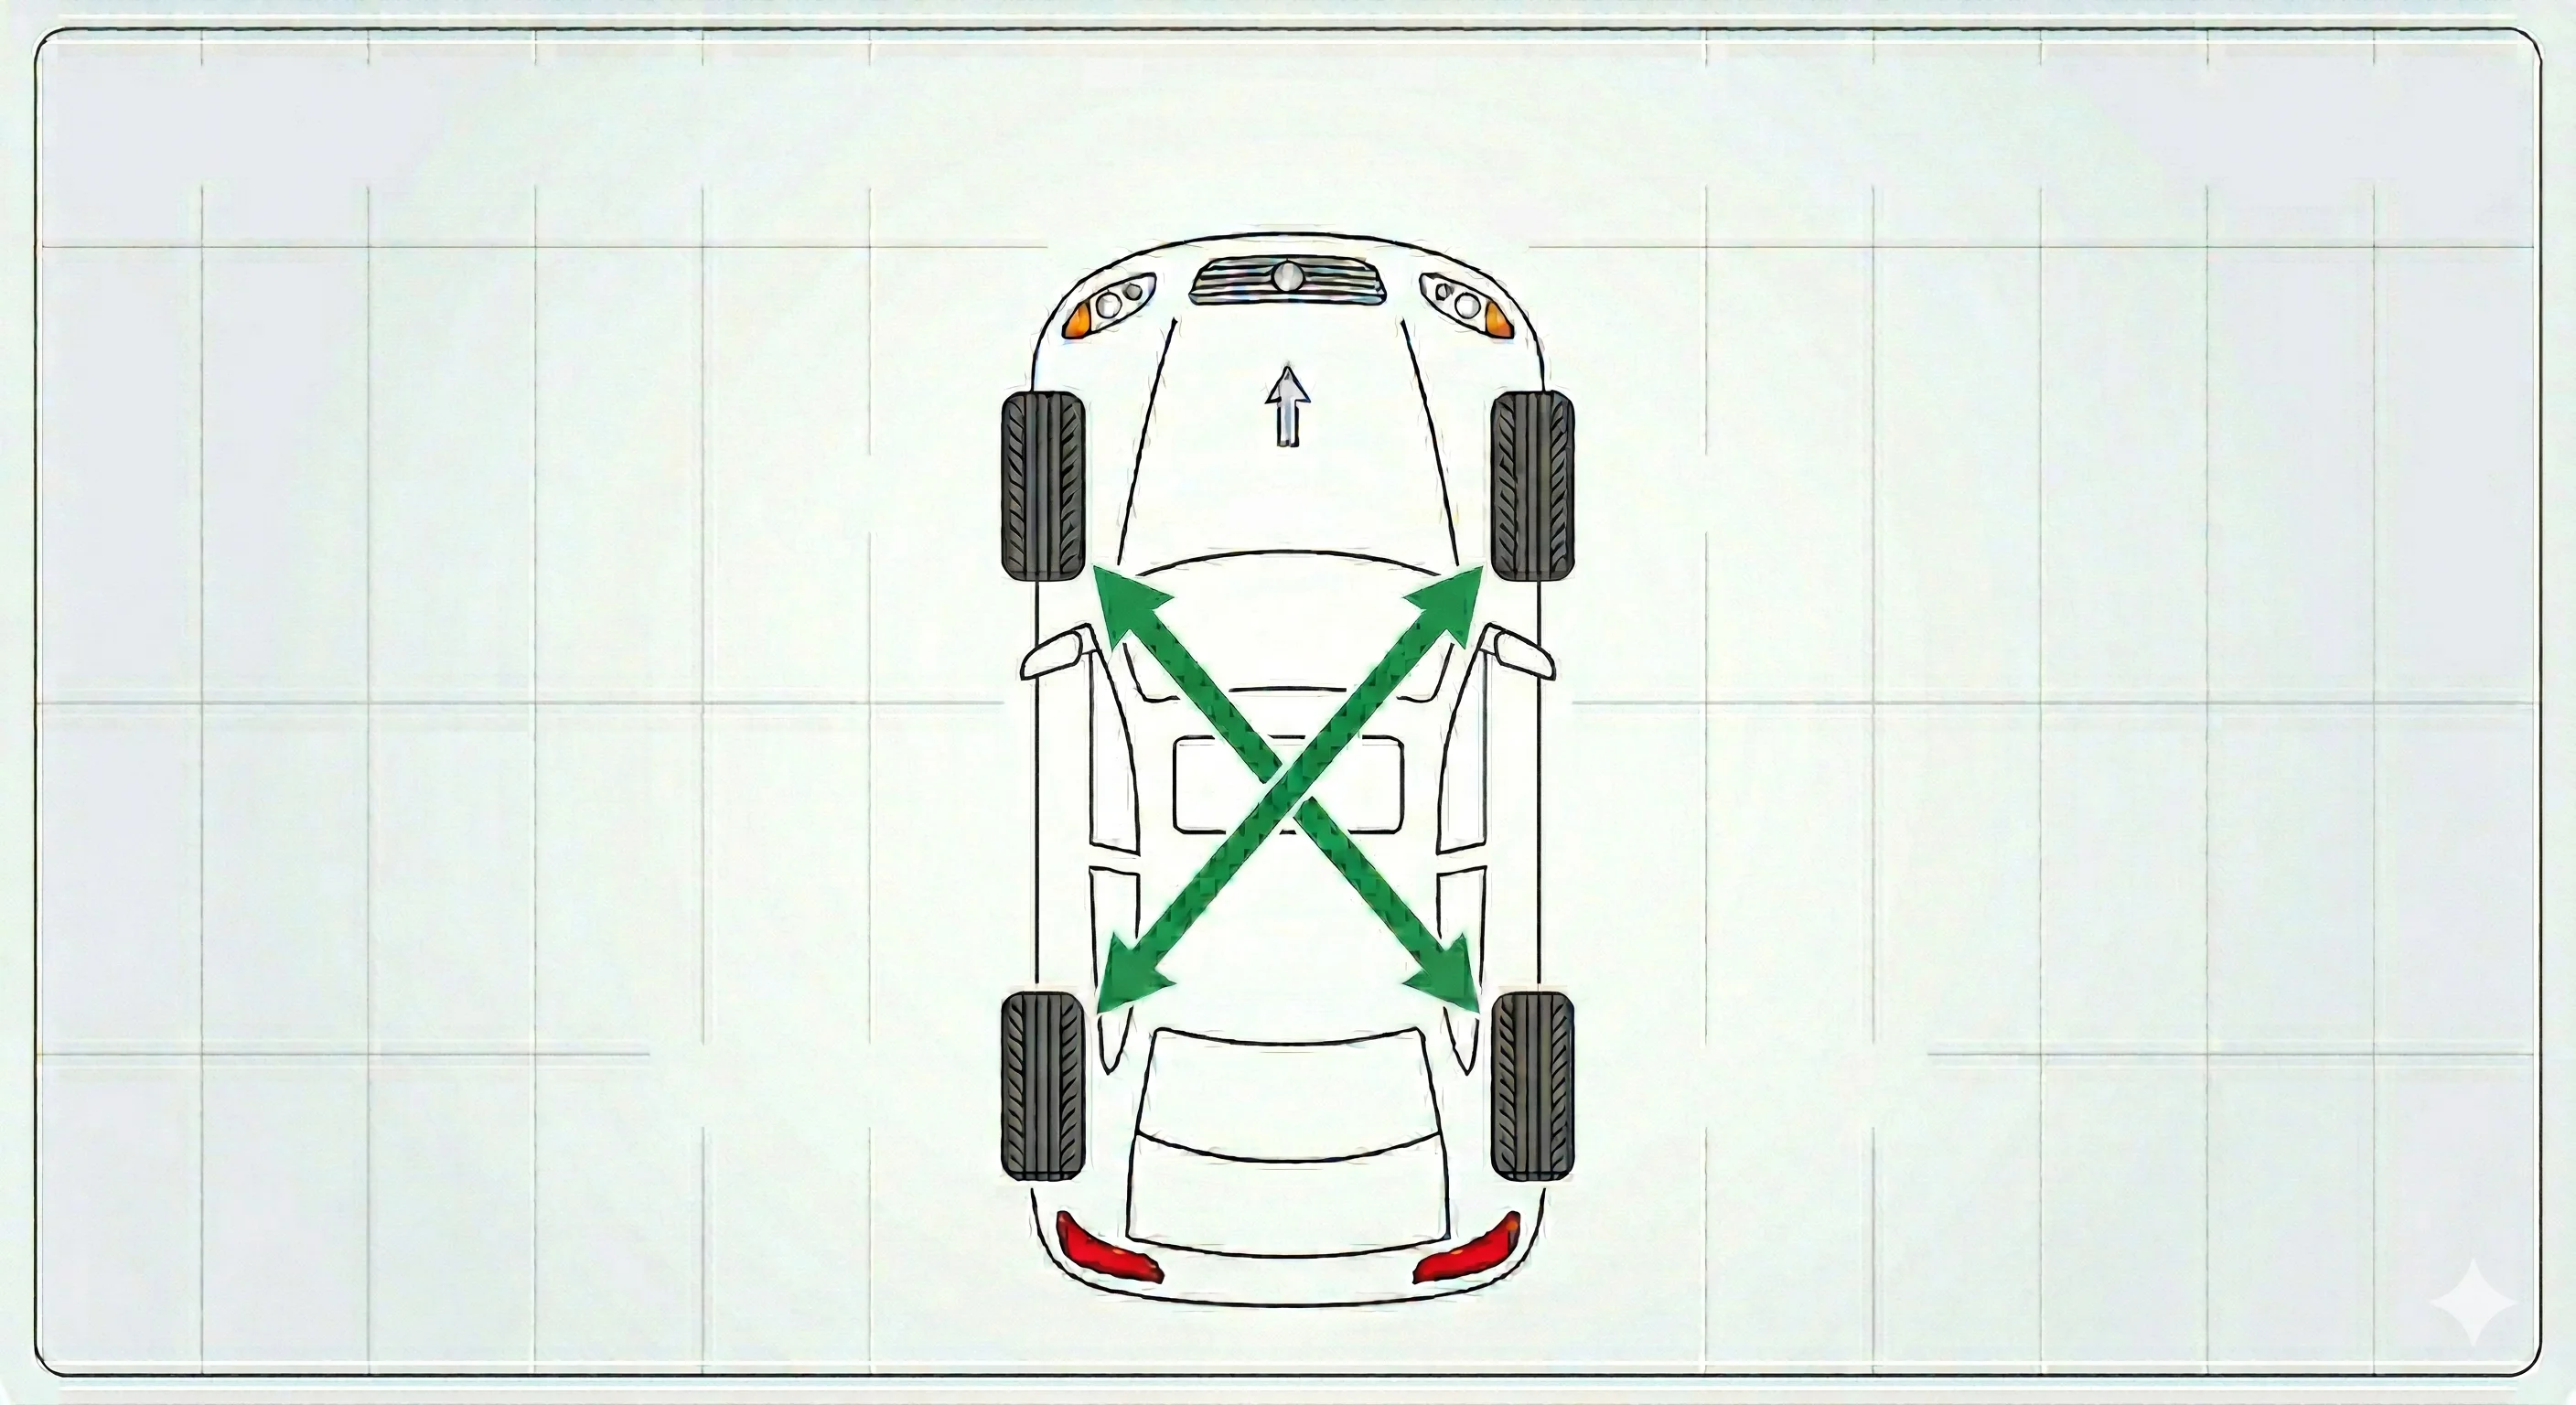
All four tires cross diagonally: left front to right rear, right front to left rear, left rear to right front, right rear to left front. Every tire changes both side and axle simultaneously. This pattern is aggressive in redistributing wear and works for vehicles where all four tires show similar wear rates. It is not the default recommendation because it can mask wear rate differences that the standard patterns would reveal over time.
Directional Tires
Directional tires must stay on the same side of the car. The tread pattern is designed to rotate in a specific direction indicated by an arrow on the sidewall labeled “rotation.” Running a directional tire backward degrades wet evacuation and in some cases voids the tread warranty.
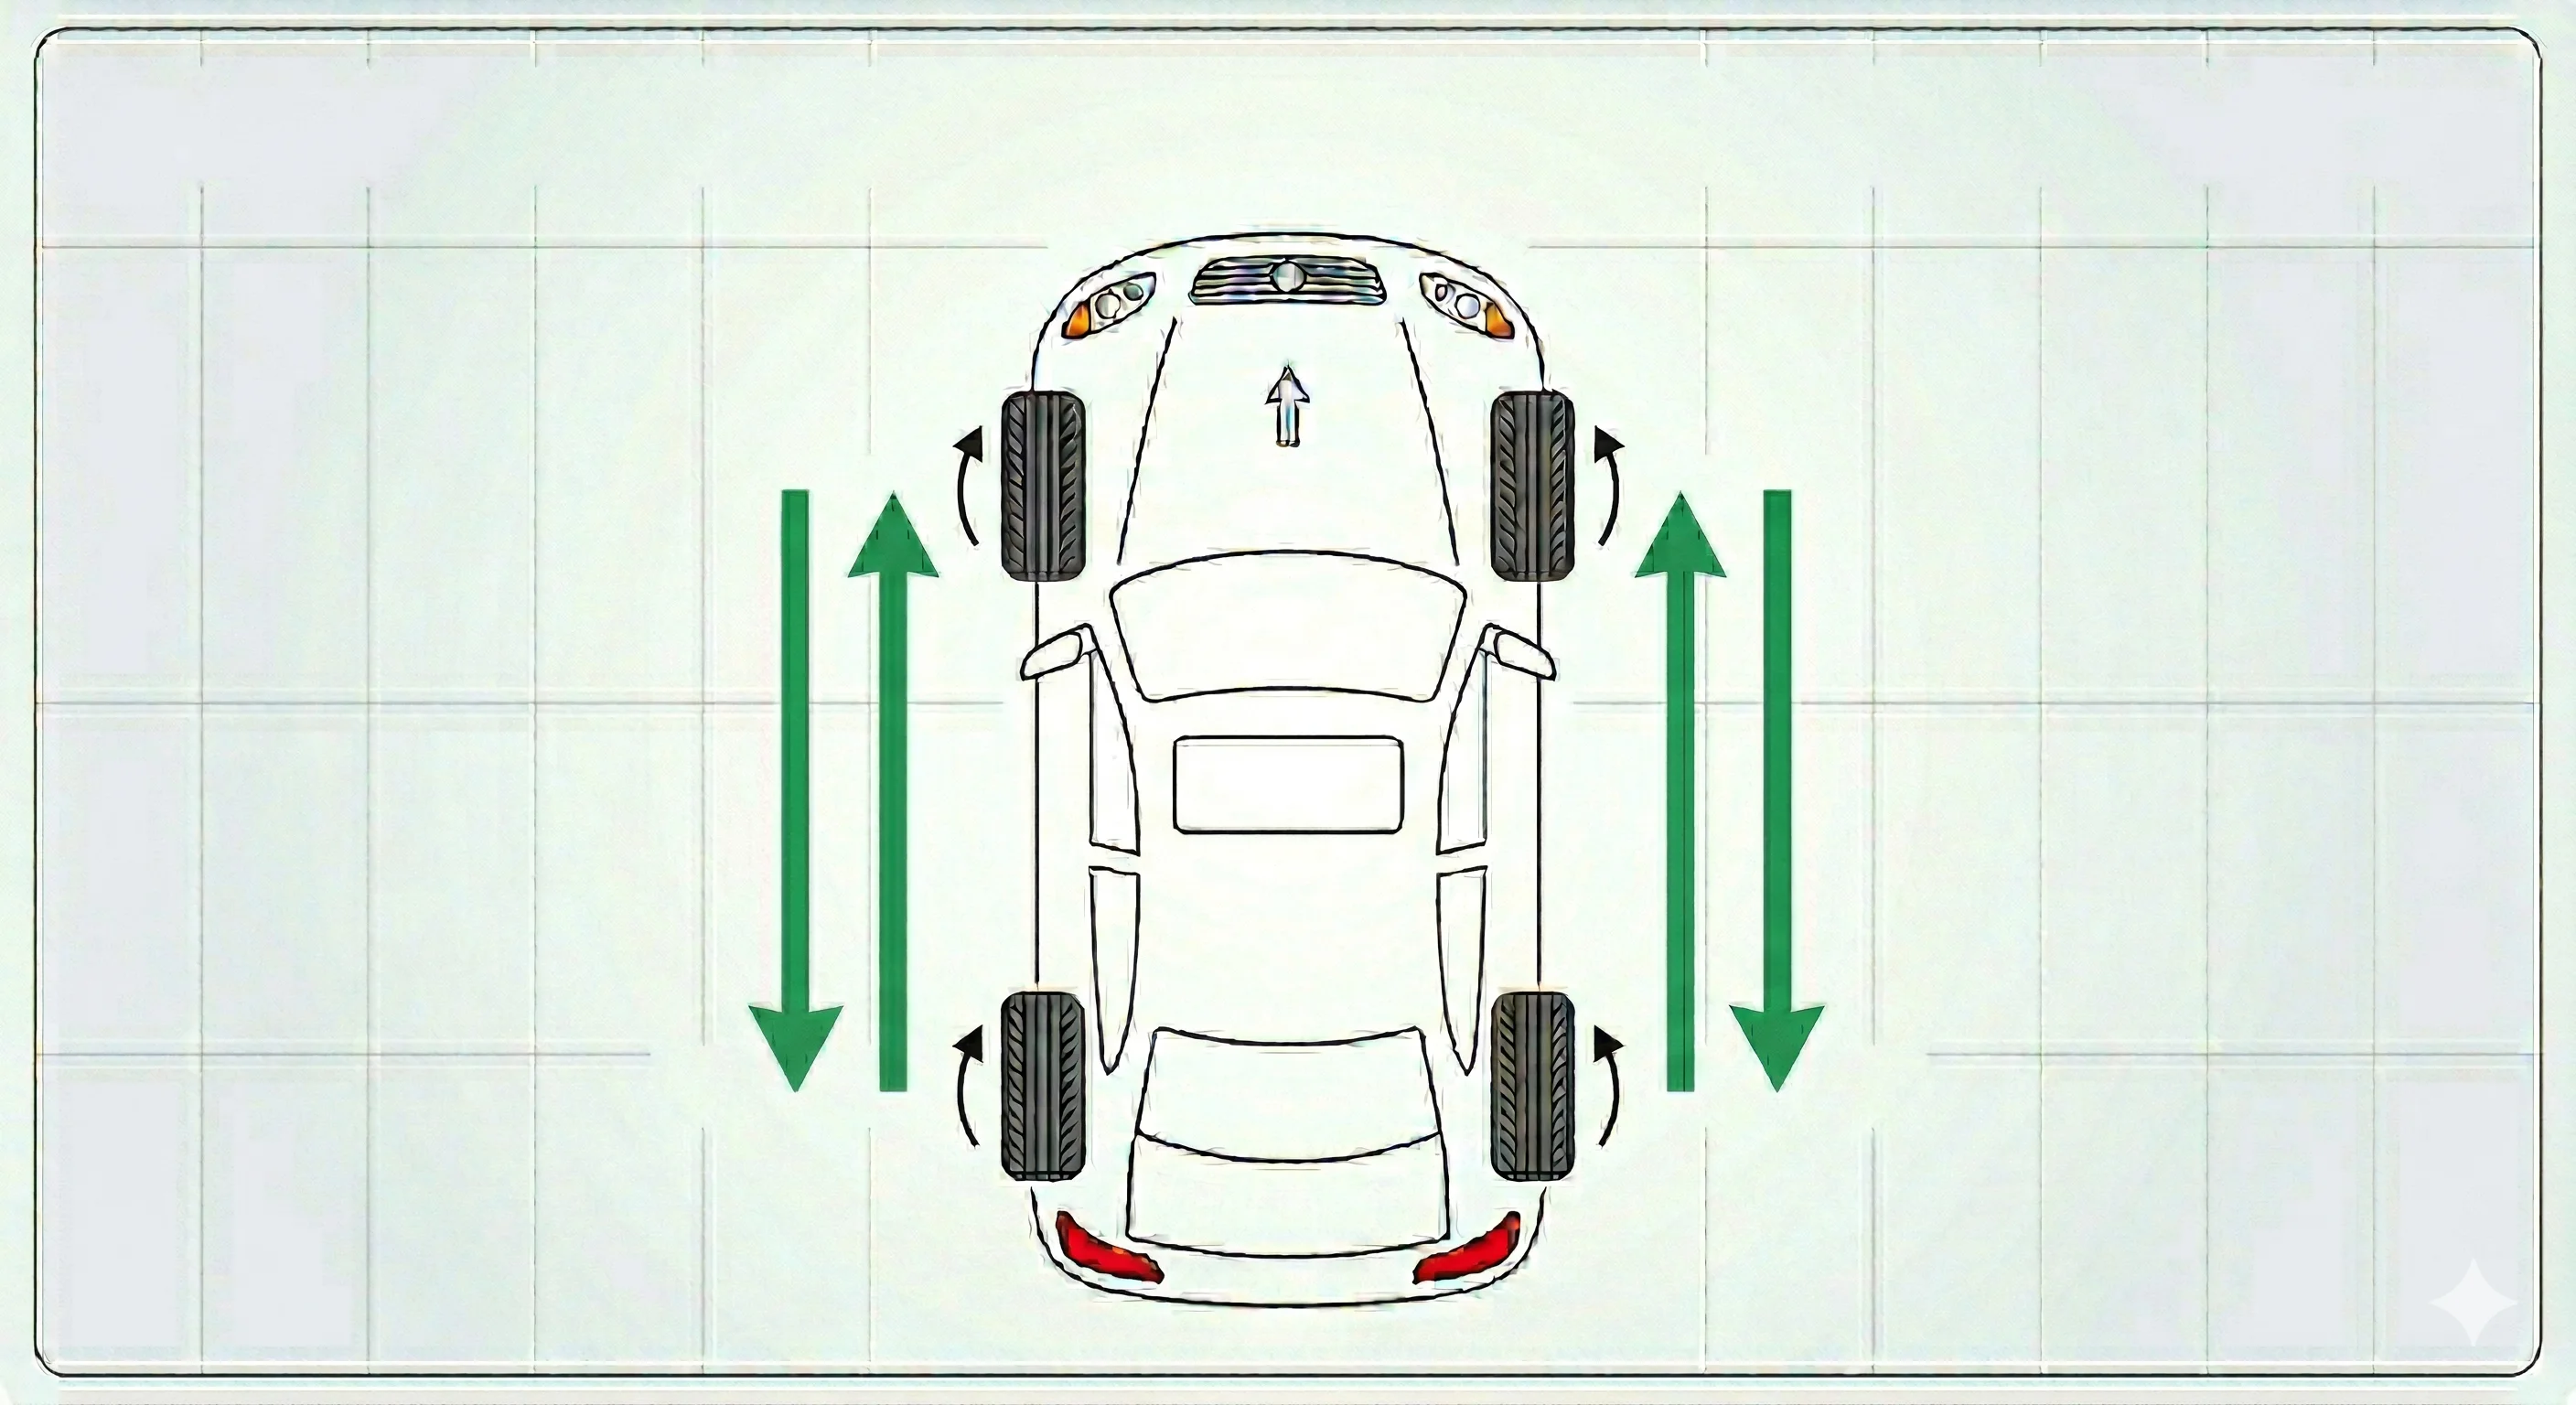
Directional tires can only rotate front-to-rear on the same side: left front to left rear, right front to right rear. This limits the wear-redistributing benefit of rotation because tires never cross to the opposite side. If your front and rear tires on the same side wear at very different rates, a directional setup accumulates more tread depth mismatch over time than a non-directional square setup would.
If you want to cross a directional tire to the opposite side, the tire must be dismounted, remounted in the correct direction on the opposite rim, and rebalanced. This costs time and money and is not typically worth doing at a routine rotation interval unless you have a specific reason.
Staggered Setups
A staggered setup uses wider tires on the rear axle than the front. Staggered tires cannot be rotated front to rear and rotation is generally not an option. The consequence is that the rear tires on a RWD staggered car take the full load of acceleration and cannot be relieved by rotation. Expect meaningfully shorter rear tire life compared to a square setup. Budget accordingly, or budget for a square aftermarket wheel setup if longevity matters more than the staggered look.
The one option for a staggered setup is side-to-side rotation: left rear to right rear, left front to right front. This only makes sense if you are seeing one-sided wear, for example, camber wear on a car that has different camber on each side. It does not address front-to-rear wear rates and is not a standard rotation.
Full-Size Matching Spare
If your vehicle came with a full-size spare in the same size and specification as the road tires, it can be included in a five-tire rotation. This is relatively rare in modern vehicles, which mostly use space-saver spares or no spare at all.
A five-tire rotation extends all-tire life by approximately 20–25% because each tire spends proportionally less time in any single position. The simplest five-tire pattern: rotate four tires rearward-cross and move the old left front tire to the spare position, putting the previous spare in the old left rear position. After four rotations, every tire has visited every position.
Space-saver spares cannot be included in a rotation. They are not the same diameter, construction, or speed rating as road tires.
Tire Balancing
Tire balancing corrects for small weight imbalances in the tire and wheel assembly. No tire or wheel is perfectly uniform in mass distribution, and even small imbalances produce vibration at speed. An imbalanced assembly creates a harmonic vibration that you feel as steering wheel shake if it’s from the front or a seat/floor vibration if it’s from the rear at highway speeds.
Static imbalance creates an up-and-down hop. Dynamic imbalance creates a side-to-side wobble. Modern balancers correct for both simultaneously.
When to Balance
Balance tires when they are first mounted and at every rotation. The common objection is cost but many rotation services include balancing, and those that do not often charge $10-20 per tire. Over the life of a tire set, balanced tires wear more evenly, last longer, and produce a better driving experience. The cost of skipping balance shows up in accelerated tread wear and vibration that worsens over time.
Balance again after:
- Any tire repair (plug or patch changes the mass distribution slightly)
- Hitting a significant pothole or curb (can shift wheel weights or cause wheel damage)
- Persistent vibration that develops at a specific speed
Wheel Weights
The balancer attaches small weights to the wheel to offset imbalances. On alloy wheels, weights are usually clip-on at the inner barrel lip or adhesive-backed patches placed inside the wheel face. Coated or painted wheels may use only adhesive weights to avoid finish damage from clip-on weights — specify this if you have a wheel finish you want to protect.
Alignment Basics
Alignment is the adjustment of your suspension geometry to keep your tires pointing at the correct angles relative to each other and the road. A properly aligned car tracks straight, wears tires evenly, and requires minimal steering input to maintain a straight line.
There are three primary alignment parameters:
Camber is the inward or outward tilt of the tire viewed from the front. Negative camber (top of tire tilted inward) increases cornering contact patch and is used on performance vehicles. Too much negative camber increases inner edge wear significantly. A car with worn inner edges on both front tires often has excessive negative camber.
Toe is whether the tires point slightly inward (toe-in) or outward (toe-out) viewed from above. Toe-in is the most common setting for stability on the front of most passenger cars. Incorrect toe produces feathering: tread blocks worn smooth on one edge and sharp on the opposite edge. Feathering is the primary alignment-related wear pattern and is usually visible and tactile.
Caster is the fore-aft tilt of the steering axis viewed from the side. It primarily affects steering feel and return-to-center behavior rather than tire wear directly. Significant caster imbalance between sides produces a pull.
When to Align
Align after:
- Replacing steering or suspension components (tie rods, control arms, struts, wheel bearings)
- Any significant impact — pothole, curb strike, minor collision
- Noticing a pull to one side or off-center steering wheel at straight-ahead
- Seeing poor tread wear develop
Alignment does not have a fixed mileage interval the way rotation does. It drifts when something changes in the suspension geometry, an impact, component wear, or a modification. Checking alignment annually or after any suspension work is reasonable for a daily driver.
Reading Wear Patterns
Wear patterns are diagnostic. Before each rotation, take 30 seconds to look at the tires you are removing.
Center wear (center tread worn more than edges) → chronic over-inflation. The overinflated contact patch sits on the crown of the tread and wears the center faster. See Tire Pressure Guide for inflation fundamentals.
Edge wear (both shoulders worn more than center) → chronic under-inflation. The underinflated tire bows and sits on its edges, wearing them faster. Under-inflation also overheats the tire.
One-sided shoulder wear (inner or outer edge only) → camber misalignment or combination camber and toe wear. The tire is tilted enough that only one edge is fully in contact under load. This requires an alignment correction, not just a rotation.
Feathering (tread blocks smooth on one side, sharp on the other) → toe misalignment. Particularly visible on front tires. Requires an alignment correction.
Cupping or scalloping (diagonal patches of uneven wear around the tread, tread dipping and rising in irregular intervals) → worn or damaging shocks/struts, or an out-of-balance tire. A shock or strut that cannot dampen wheel bounce allows the tire to skip against the road surface at its natural frequency. This produces a washboard wear pattern around the tire. Rebalancing helps if balancing is the cause. If the shocks or struts are the cause, the wear will continue regardless of rotation or balance.
Flat spots (localized flat areas) → hard braking lock-up without ABS, or sitting stationary for extended periods in cold weather. Flat-spotting from deformation can be temporary or permanent depending on severity and compound.
When you see any of these patterns, rotation alone does not fix the root cause. Rotation redistributes the wear across all four tires but does not stop the pattern from continuing. Fix the underlying issue before expecting the wear to normalize.
The Full Rotation Checklist
Every rotation is a maintenance window. While the wheels are off:
- Check inflation on all four tires cold before mounting. Correct to spec.
- Measure tread depth with a tread depth gauge at three points across each tire (inner, center, outer edge). Record the readings.
- Inspect tread for embedded nails, screws, or debris. Anything on the surface that hasn’t penetrated the tread can be brushed away. Leave embedded nails or screws in as they may be holding air and take the vehicle to a shop for the appropriate repair.
- Inspect sidewalls for cracks, cuts, bubbles, or bulges. A sidewall bulge indicates internal damage and the tire needs to be replaced.
- Visually inspect brakes while the caliper and rotor are accessible. Look for rotor grooves, pad thickness (visible through the caliper window on most designs), and any signs of fluid leaks.
- Torque lug nuts to spec in a star pattern after mounting. See Lug Nuts and Wheel Torque Specifications for the full breakdown. Retorque after 50-100 miles.
You did it. You got to the end. Amazing. Now you know which rotation pattern goes with your drivetrain, why directional tires limit your options, and what that diagonal scalloping on your rear tires is actually telling you. Have a burning question you want answered in a guide? Email us at hello@rimlist.com.